How To Make An Altered Art Mixed Media Project with Kids - Great for Gifts
 |
| photo heavy post = slow load time. stick around to see all the photos. |
For the beginning of April Canvas Corp Brands issued a challenge to designers to think out of the box and create projects for kids using their products. Canvas Corp is a huge company with a large product line, including 7 gypsies and Tattered Angels Paints. I wish I had their warehouse close by so I could just pop over there every time I wanted something.
I really liked the idea of this challenge - working with kids and having four of my own kids, I know how much children enjoy trying out new stuff, mixing up products and mediums and just playing with things. (How much my daughter loves getting into my stuff!)
I like the idea so much you can be watching for some future posts here on Dapoppins on doing "grown-up" art with young people.
We decided to alter a Sucrets tin (that I had been hording) using Tattered Angels Naturally Aged Paint Systems in Turquoise. These come in sets with four distinctive mediums to layer together.
Although there are a lot of altered tins out there, they are not usually made by kids but this is a totally doable kid project. In the same way that teachers assist students with putting together cute gifts for Mother's Day and Father's day - there is no reason, with a little assistance and planning that crafty minded parents (and Nannies) can't help children complete this project.
Basic skills needed
- able to aim a spray bottle
- able to use scissors
- patience
- spread glue
Supplies Needed
- Alterable Tin (we used a Sucrets Tin because it had a flat workable surface)
- Metal Primer
- Mod-Podge
- Gesso
- Spray Fixative or Sealer
- Tattered Angels Naturally Aged Paint Systems Precious Stone Turquoise and Tattered Angels Glimmer Mists
- Hair Dryer to speed drying
- Paper Bits
- Scissors
- Desired Embellishments - White Unibal Signo Pen
- Jump Rings, Beads, Head Pins, Hammer, Round Nose and Flat Nose Pliers, Necklace,- Optional

Step One :
Spray tin with metal primer and let dry. The older child can do this outside with supervision, (my daughter is eleven. She could have done this but she was doing homework or some such thing so I did it for her) or the adult can do it ahead of time. I sprayed two coats but that was more because I was trying to get some primer on every surface than being intentional with two coats.
When the primer is dry (about fifteen minutes) Elianah tore some paper bits and used Mod Podge to glue the papers down on the outside and inside of the box.

Step 2.
Paint the inside of the tin. Elianah picked out Tattered Angels Glimmer Mist from my stash for the inside of the box. She sprayed it on, then chose to spread it around using a baby wipe.

Step 3.
Follow directions for the Tattered Angels Paint Systems kit. Because this is a metal box and not a recommended surface we did two things different. We added primer. And we used a fixative between glimmer mist layers. To get a really good effect with the paints we would air dry, and spray a fixative when we really liked an effect, then dry the fixative and repeat. Please note - the biggest challenge of this project is dry time. It is best to air dry and second best is to use a hair dryer. The more layering you do the better it will look.
(I got lazy with the fixative and used which ever came to my hand. One spray bottle said Fixative, and the other said Sealer both products worked to hold the Glimmer Mists in place so that I we could get the layered spatters we wanted.)

Step 4
Embellish the outside and inside of the box as desired.
Elianah decided to tone down the interior color by adding a little gesso and wiping it off with a baby wipe. She's seen me use this mixed media technique often and had wanted to try it. Using gesso (or white acrylic paint) is optional and not really necessary for this project - but it does add a nice effect.
My daughter designed the dress and inside of the box entirely on her own. She drew the dress and cut it out. We decided together that different colored sleeves would work better than same colored sleeves, but for the most part, this is entirely her design. She also designed and cut all the skeleton parts herself. (My suggestion was to put a little note book and pencil inside or glue in a positive quote - neither of these fulfilled her vision, but you might also offer these ideas.)
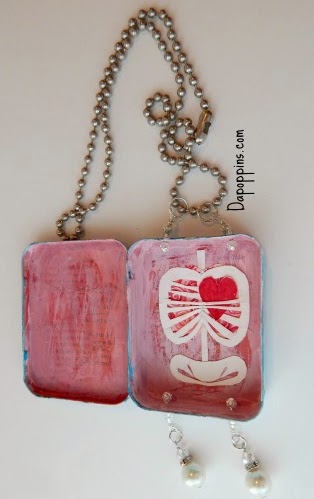
We added some basic jewelry bits to make the box so it would hang. I have never made any jewelry but since I've been gathering supplies over the last year so that I could learn how to make bobs for added decoration, we decided to give it a go. The box doesn't have to hang or have dangles, but we thought it gave this design a nice touch. I just made the holes by measuring and pounding a nail through two spaces in the top and bottom.

We both think the end result is really beautiful. What do you think? Is this a mixed media project you might make with kids? Don't you think something like this would make a wonderful Mother's Day gift or Teacher Appreciation gift?
I thought it would make a lovely gift. I asked Elianah if I could have it.
She said, "No."
Tags:
Canvas Corp Brands
children
gift
kids
mixed media art
mixed media for kids
Mother's Day
Motherhood
Tattered Angels
watching movies

8 comments
wow - like a modern day locket but made by the one who wears it. WOW
ReplyDeleteGreat job
Fabulous creations and great tutorial....she is beautiful and I can tell she loves to wear art!
ReplyDeleteGood job on all counts - love the results!
ReplyDeleteWonderful make and your model is adorable!!
ReplyDeleteHa, ha! Love the bones inside - just what my daughter would have done, too.
ReplyDeleteThis is soooo soooo very special. It's just perfect - adorable - wonderful. GREAT project. j.
ReplyDeleteBeautiful altered box ladies!! I really love the inside of the box with the rib cage and heart inside. It's really cool and unique!
ReplyDeleteOh and about asking her to give it to you, LOL!! Of course she said no, She's Eleven, Ha, Ha, Ha, !!!! (my youngest son just turned 15, I asked him for a Christmas coloring book I found while cleaning his room up. Guess what he said?? NO! apparently he likes to color too, LOL!!!
Thanks for sharing this really fun project with all of us. It looks like you guys had a bunch of fun and that's what matters.
Big Hugs!!
Reeah.
What a fantastic project and awesome job at recycling! Way to go!
ReplyDeleteThoughts and comments always welcome and will be posted after viewing by the moderator.