• Home
  • Free Story
  • Big Story
    • Writing Story
    • Gratitude Story
    • My Story
      • Nanny Story
      • Funny Stories
  • Social
    • Facebook
    • Twitter
    • Periscope
  • Art Story
    • Kid Art Story
    • Creative Story
      • Mixed Media
      • Art Journaling
      • Heart of Gratitude
      • Creating Fearlessly
      • Encouragement
    • Bible Art Journaling
    • Design Team
  • Yourdori
  • Contact Us
Dapoppins

Things to consider when choosing your very first art journal:

There are a few questions I try to answer before going out and picking up a book for my art.  Store bought journals can be expensive.  I just picked up the Jane Davenport large journal for a test drive, and without a coupon, that book was a budget-busting $36.00. (I used a 60% off coupon) At that price, this isn't the kind of book you want to start arting in and then find out you don't like anything about it.  The surface where I express my heart or just lay down layers of rainbow happiness is super important.  If it doesn't "relate" to me, if it doesn't feel right in my hands and under my paint brush, I'm not going to want to use it.  If I feel like I paid too much and then don't like what I paid for, guilt can creep in and get in the way of all my fun self-expression. 

But fear not fellow creativity explorers!  Asking yourself a few simple questions while looking for your perfect book will eliminate the risk of buying the wrong book. 

This is the huge version of this journal and includes burlap and canvas pages. 

What size best fits your style and needs?

If you have ever done any journaling before, this might be an easy question to answer.  You might already own several books with lines of words and emotion.  Not only do you have a favorite size you also have a favorite pen!  But if journaling is completely new to you, you're going to want to think about where you're going to do your arting.  Is your book going to travel with you?  How will you carry it?  What will you carry your supplies in and how do the book and your supplies fit together?  What size feels right in your hands?  Does a large surface feel like just too much space to fill?  Is a smaller surface too small to express what you want to do?  If you aren’t sure, take a risk and just buy something that appeals to you.  Go with your gut!   


       What type and weight of paper do you need?

There are books out there that have paper for sketching, drawing, mixed media and watercolor painting. You can even buy a pad of canvas paper for acrylic painting.  The books also have different bindings. Whenever possible, open the book and touch the paper.  How does it feel in your hands?  Does the book lay flat? Check the weight of the paper.  It will be somewhere in the description.  60lb, 90lb, 140lb, the weight of the paper is important because of how you're going to use it.  Will you just use pens and pencils?  Are you going to want to collage on the page?  Will you be trying to create texture with pastes and layers?  Will you use a lot of water or other wet media to spread your color on the page? I like to use watercolor paper (140lb weight) because it stands up to whatever I throw at it.  It takes a lot of wet to make the page curl – in fact I have never really had that happen.  Mixed Media books are usually 90lb.  They can take the watercolors, but the paper will curl, and sometimes color soaks through to the other side.  However, even thin paper can be built up with some collage, gesso, and matte medium (or mod podge.) 
And old book can become a great altered book or art journal.

  How are you planning to use your art journal?

This is really the most important question. Having an idea of how you want to use your book will help you choose the perfect book.  If you are just starting out and developing your style, discovering what just makes the art flow out of you,  and  just want to try everything – go for the watercolor 140lb weight.  It can take all the creativity you have to offer. 


This book has thin pages, but it lays flat, which makes it great for drawing and writing. 


I hope this helps.  The fact is there are a lot of options for your art journal.  You can even make and bind your own, which is probably easier than you think.  If you are day dreaming of a space where you can spread happy colors on a page, stop dreaming, grab a coupon, and get a journal! 

Happy Arting!
Dapoppins


S
H
A
R
E
Mixed Media Kit 
Plus the Mini Me Kit  

UnBOXING

As a member of the Kraaft Shaak Design Team I was gifted a Mixed Media Kit to play with.  This box of crafty goodness comes packed with papers, a paint sample, and mixed media fun.  There is even glitter. 

 I loved it so much ordered a second kit for my eleven year old daughter PLUS a Mini Me Kit and a Chalk Writer.  I gotta say, she absolutely loved unpacking all the goodies. 

 Confession.  I love unpacking the goodies too, and we kinda argued about it.  She did have to remind me that I ordered the kit for her ---so with a sigh of utter resignation ---I forced myself to let her unpack it. And as silly as it sounds, this is a true story.

Since it is her kit, she got to decide what to make.  That took awhile as she went back to the kit again and again to dream up the perfect way to use the different products inside.

 I was kinda hoping she might see how the Prima Chalk Board Paint, the tray, and the Chalk Writer might go together.  (The Chalk Writer isn't apart of the kit itself, but it's bright pink and writes this fat, smooth and creamy line.  How could I resist it?) Since She loves to write lists, recipes, and plans, I thought she might enjoy this.  

I was so happy that she agreed with what I thought would work.  This kind of agreement happens so rarely it was almost magical!  
Kreating 


She decided not to embellish the tray.  


Neon Pink Craft Decor Chalk Writer


The next Project was something she had made before out of construction paper.  This time she got to use real ephemera papers, a pretty napkin and scraps of papers - all from the Mixed Media Kit. 

Paper Ephemera 


She applied them to a canvas using matte medium (from my stash.)


My daughter designed and cut out her own shapes to create an owl, choosing different paints from my personal collection. (Yes, I have a paint collection.  My grandma collected elephants.  I collect art supplies!) 


She layered the papers, cut the owl, and used tiny beads and mica lakes from the kit to embellish.  The little gems were something that came from her own stash.  (Yes, my eleven year old has a stash.  It's okay.  I steal from it all the time when she's at school.  Don't TELL.)  She wanted a night sky specifically so she could use those tiny blue beads, then added only 'just enough.'  I love how the owl turned out.  He is so perfect for October!  Even if he's not the least bit frightening. 


She worked on the little mandala canvas  while the layers of the owl were drying, painted it and then did the details with two different white pens.  My favorite Signo (available at the Kraaft Shaak) and a Posca White Pen.  She also used the mixed media kit's Art Sugar (Pretty, super fine glitter.  We love this stuff.) to highlight the white areas, but my camera couldn't catch the gorgeous sparkle.  

Why This Kit?

This kit has endless possibilities for a child.  Even after three projects, there are still lots of elements left over that can be used in collage, art journaling, mixed-media, decoupage, canvas art, altered art and recycled art. Less expensive art kits can be purchased in stores for kids - if your child is satisfied with foam, pom-poms and oddly colored markers that work for one day.  There are real mixed-media elements in this kit that work for both grown ups and kids while offering a chance to try out new things.  

It is a quality kit that will last way beyond one day of projects.  

I recommend you give it a try during the short, cold days of winter.  It worked well for us during the long, hot days of summer!  Make sure you come over to the Kraafters Kommunity on G+ and share what you made.  You can also visit the Kraaft Shaak Design Team page for some really Kool and Kreative ideas how to use a Mixed Media kit.  


While you are over there...here are a couple of things you (Mom) might consider getting for me to put under my Christmas tree.(Mom- hint, hint.)  I think they would be fantastic to use in my Bible journaling, art journal, or cards for friends.  Don't you? (Mom?).  


On MY personal Wishlist 


Affiliate links: This post contains lots of links to the Kraaft Shaak.  I was gifted a Mixed Media kit as apart of the design team but I receive no commission if you click on the links and browse the store. 

S
H
A
R
E


I'm a compulsive storyteller, a life documenter and a bit of an essayist.  Someday, when I pass on, my kids will  sort through my things and find a complete history of my life and probably, their lives too.  No one will have any trouble plotting my story, because I have been documenting it since I could hold a pencil.  This desire to document my life easily lends itself to scrapbooking - and in my quest to personalize my story, I quickly transitioned to  mixed-media.

It's my story.  I get to tell it and I am driven to share it - and no one gets to tell me how I share it.   That's the cool part.  There is no wrong way to share your story.  There is no wrong way to scrapbook. And there is no wrong way to create a mixed media piece.  


detail of mixed media tag
mixed media tag

There are design things a person can do to make a piece more pleasing to everyone, Yes.  But if you are pleased with your work, then that is really what matters.  Art journal blogs, scrapbookers, and mixed-media artists everywhere will tell you the same thing - It's your story, tell it like you want to.  


Your art story can be told on all sorts of surfaces: paper, wood, canvas or anything that can hold a coat of paint.  If your surface will hold your medium, you can tell your story on it.  I've worked on paper, wood, canvas and plastic - my surface is as important to me as what I put on it. 


You should know that not all mediums act alike.  This is a biggie.  Combining oil based, water based, and pigments with or with/out binders is a little tricky.  As long as you know what each medium will do and how it reacts, you'll be  fine.  There are tons of easy ways to find out how to use your supplies - googling your questions being the number one source - the second is to just do- play with what you have, mix it up, discover what works on your own journey.  

This is a collage of the many stages of a Lady I've been working on.  I used collage techniques, gesso, acrylic paints, and water soluble oil pastels, water soluble crayons and stablio pencils   I didn't like the face on the bottom right, and kept working at it until I got to the face on the upper left.  It's still not finished, but I'm good with it here for awhile.


My local stores carry some of the things I like to use in mixed media.  Some.  Most stores have paint and canvas and papers.  But Mixed Media incorporates a huge variety of elements that my local walk-in stores seem unable to provide.  Also, some media is expensive, such as good paint or good pastels. 

 It takes time to build a good "library" of materials to use for mixed media.  I've been working on my "craft library" for about twelve years.  

It's best to use a coupon and utilize sales.  Jo-Ann's has some of the best online sales, while Blick and Utrecht offer online prices that almost always beat Amazon.com prices. 

 And this is where you find out that there are two kinds of mixed media art stores.  Dick Blick Art Materials and Utrecht Art Supplies do not carry many scrapbook/mixed media supplies, if any, and to my opinion only grudgingly.  You won't find them fully stocked with the new Prima Marketing Mixed Media lines, Tim Holtz Ideology, or Dina Wakley Paints. Stencils are fun to use in mixed media, but there is an amazing variety of them that just aren't available through the traditional resources.  

For these kinds of products I shop Joann"s, or a few little online shops where the personal attention to my order and my questions offsets the little shop prices.  

I've shopped at: 

The Kraaft Shaak - The best customer service.  You are always an individual and opening orders is like Christmas! 

Blue Moon Scrapbooking - great selection, fast service, free shipping for orders over $50

A Cherry On Top- good sales, good selection, fast service. 

Canvas Corp Brands.- Limited to their brands, but all my favorite things are there,  like Tattered Angels paints, 7 Gypsies, Canvas Corp papers, fabrics, canvases and hundreds of surfaces.  

Any guess what I've wanted for every Christmas and Birthday for the last 12 years?


If your new to telling your story through art and mixed media, don't feel like you have to own the whole rainbow before you start, you don't need to.  There is a lot you can do with just three or four colors.  But I do warn you.  Craft shopping is a little teeny bit addictive.

Have you ever wanted to dip your fingers into some Mixed Media play?  Do you play already?  Have you played with Mixed Media with your kids?  (Maybe you have but you didn't know it!)

Mixed Media is a great way to tell your story.  I would love to hear in the comments how you are using it to tell yours! 


S
H
A
R
E

The Kraaft Shaak is a little crafty internet shop based somewhere East of me.  This was their first year for a design team and I was to be chosen to be apart of it.  Our mission was to use the Kraaft Shaak's unique mixed media kits in three projects.


A FEW WAYS THIS KIT HAS BEEN USED:

Sandra made a Peacock Necklace

Design Team One Sandra #ksdt2015


Shel made Flip Flops

Design Team One Flip Flops By Shel


Sylvia made a Bunny Sitting On a Box

Design Team One Easter Box by Sylvia


My creative Brain kind of exploded a few times with all the ingenuity to come out of this mixed media kit.  

If you are a mixed media newbie.  If you are a mixed-media oldie.  If you are a scrapbooker, art journaler, use art therapy, have a artsy, creative child, know someone who has an artsy creative child, or if you are a person who loves to be FEARLESS and try new things- This KIT is For YOU. 

But all good things must come to an end and this is my last challenge for the team.  My challenge was to Kill the KIT.  Which means, to use everything up.  Now I wish I had better photos, but over the last few months I basically spread everything from the kit all over my bedroom craft space.  

I do have a couple of photos...


2 oz paint goes farther than you think.

This is the remains of my eggshell colored Prima Chalkboard paint and my Prima Sand Texture Paste Samples from the kit. 
My project started by using a ruined project...it was a picture that had sustained a nasty spill of dark paint across the face of it and I couldn't get it off even after trying.  So I tore it all apart, and started over.  The Kit came with a sample selection of ephemera papers - lovely map pages, tissue thin dictionary pages, book pages.  All the stuff I love to use as the first layer of a collage.  I had a few of these left after my other projects ( the necklace and book) - so I tore them up to cover the old project.  

The kit comes with a sample paper pack.  It has enough papers for several projects.
I used some in all three of my challenges. I used the Prima chalk board Paint in two of the challenges. 


I've made something like this before with a silhouette...but I couldn't get this one right.  I hated it.  It wasn't fulfilling my vision. At. All. So I tore this apart and Friday morning at about 5:30 a.m and  then I raided my daughter's toy box. 

One of the things I had left in the kit were some lace ribbons and gauze.  I had meant to use those in the first attempt had incompletely forgotten my goal to use up the rest of goodies in the mixed media kit.  Now I had my chance to incorporate them.  

Texture, Tissue Paper, Tattered Angels Glimmer Mists, Kraaft Shaak Mixed Media Kit, Dapoppins Art


I layered the ribbons and gauze with tissue papers to add the dimension I wanted to recreate my original idea properly. 


Kraaft Shaak Mixed Media Kit


Kraaft Shaak Mixed Media Kit


Kraaft Shaak Mixed Media Kit

Kraaft Shaak Mixed Media Kit

This theme means a lot to me personally (feel free to ask me about it!) But I'm so curious to see how other's respond to this piece that I am not going to tell it's story.  I wonder if it might have a story for you?


Kraaft Shaak Mixed Media Kit


To get an idea of what is in this kit, and how much I had to play with you might want to check out this video from Sherrie, who answered the call for the next design team.  She share's all the oodles of the things that come in the kit and cracks me up at the same time.


Did you watch it?  Did you see how much is fun and craftiness is packed into this little box?  Do you think I managed to use up everything in that box?

Well, I used up most of it.  There is still a wee bit chalk paint left, I have a map page left, and a book page that was suppose to go into the mini-book I created for the very first challenge...and I found a couple of those little sequins left over too.  So, I totally failed to "kill the kit."

But I wounded it.  Badly.

Now, Don't forget the coupon.  Don't forget to visit the Kraaft Shaak. (where there are tutorials, hangouts, hilarity, community, and art supplies everywhere)  Don't forget to buy a mixed media kit.  It's a boredom buster for kids ages eight and up at the very least. And there are loads of things you can make from it.  Check out the Design Team page at the Shaak if you're low on ideas and let me know if you make something crazy...like, FLIP FLOPS!


Be Blessed!
S
H
A
R
E
photo heavy post = slow load time.  stick around to see all the photos. 


For the  beginning of April Canvas Corp Brands issued a challenge to designers to think out of the box and create projects for kids using their products.  Canvas Corp is a huge company with a large product line, including 7 gypsies and Tattered Angels Paints.  I wish I had their warehouse close by so I could just pop over there every time I wanted something.  

I really liked the idea of this challenge - working with kids and  having four of my own kids, I know how much children enjoy trying out new stuff, mixing up products and mediums and just playing with things.  (How much my daughter loves getting into my stuff!)

I like the idea so much you can be watching for some future posts here on Dapoppins on doing "grown-up" art with young people.  

I spoke with my own personal progeny,  (We will call her Elianah) and asked her if she wanted to do something with me.  She said yes.  But as usual she put her own twist on the idea and came up with something totally her own - I saved that photo for the very end.

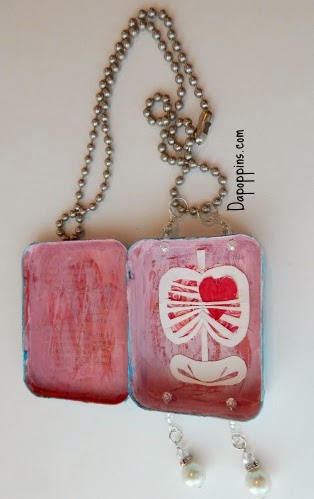
We decided to alter a Sucrets tin (that I had been hording) using Tattered Angels Naturally Aged Paint Systems in Turquoise.  These come in sets with four distinctive mediums to layer together.

 Although there are a lot of altered tins out there, they are not usually made by kids but this is a totally doable kid project.  In the same way that teachers assist students with putting together cute gifts for Mother's Day and Father's day - there is no reason, with a little assistance and planning that crafty minded parents (and Nannies) can't help children complete this project.

 Basic skills needed 
- able to aim a spray bottle
- able to use scissors
- patience
- spread glue

Supplies Needed
- Alterable Tin (we used a Sucrets Tin because it had a flat workable surface)
- Metal Primer
- Mod-Podge
- Gesso
- Spray Fixative or Sealer
- Tattered Angels Naturally Aged Paint Systems Precious Stone Turquoise and Tattered Angels Glimmer       Mists
- Hair Dryer to speed drying
- Paper Bits
- Scissors
- Desired Embellishments - White Unibal Signo Pen
- Jump Rings, Beads, Head Pins, Hammer,  Round Nose and Flat Nose Pliers, Necklace,- Optional


Step One :
Spray tin with metal primer and let dry. The older child can do this outside with supervision, (my daughter is eleven.  She could have done this but she was doing homework or some such thing so I did it for her) or the adult can do it ahead of time.  I sprayed two coats but that was more because I was trying to get some primer on every surface than being intentional with two coats.  

When the primer is dry (about fifteen minutes)  Elianah tore some paper bits and used Mod Podge to glue the papers down on the outside and inside of the box. 


Step 2.  
Paint the inside of the tin.  Elianah picked out Tattered Angels Glimmer Mist from my stash  for the inside of the box. She sprayed it on, then chose to spread it around using a baby wipe. 


Step 3.  
Follow directions for the Tattered Angels Paint Systems kit.   Because this is a metal box and not a recommended surface we did two things different.  We added primer. And we used a fixative between glimmer mist layers. To get a really good effect with the paints we would air dry, and spray a fixative when we really liked an effect, then dry the fixative and repeat.  Please note - the biggest challenge of this project is dry time.  It is best to air dry and second best is to use a hair dryer.  The more layering you do the better it will look.

(I got lazy with the fixative and used which ever came to my hand.  One spray bottle said Fixative, and the other said Sealer both products worked to hold the Glimmer Mists in place so that I we could get the layered spatters we wanted.)


Step 4
  Embellish the outside and inside of the box as desired. 

Elianah decided to tone down the interior color by adding a little gesso and wiping it off with a baby wipe.  She's seen me use this mixed media technique often and had wanted to try it.  Using gesso (or white acrylic paint) is optional and not really necessary for this project - but it does add a nice effect.

My daughter designed the dress and inside of the box entirely on her own. She drew the dress and cut it out. We decided together that different colored sleeves would work better than same colored sleeves, but for the most part, this is entirely her design.  She also designed and cut all the skeleton parts herself.  (My suggestion was to put a little note book and pencil inside or glue in a positive quote - neither of these fulfilled her vision, but you might also offer these ideas.)


We added some basic jewelry bits to make the box so it would hang.  I have never made any jewelry but since I've been gathering supplies over the last year so that I could learn how to make bobs for added decoration, we decided to give it a go.  The box doesn't have to hang or have dangles, but we thought it gave this design a nice touch. I just made the holes by measuring and pounding a nail through two spaces in the top and bottom.


We both think the end result is really beautiful.  What do you think?  Is this a mixed media project you might make with kids?  Don't you think something like this would make a wonderful Mother's Day gift or Teacher Appreciation gift?

I thought it would make a lovely gift.  I asked Elianah if I could have it.

She said, "No."


S
H
A
R
E
Older Posts Home

You can subscribe to our mailing list now! Don't forget to please check your spam for the confirmation email.

* indicates required
Email Format

ABOUT AUTHOR

Search Dapoppins

Powered by Blogger.

Labels

  • About Me (7)
  • ArtofFaithnorthwest (7)
  • Book Reviews (14)
  • Children's books (10)
  • Creating Fearlessly (10)
  • Design Team (8)
  • Encouragement (13)
  • Faith (11)
  • France (8)
  • Gratitude (9)
  • How to Write (1)
  • Nanny (4)
  • One word (5)
  • Read Aloud (8)
  • Story Telling (1)
  • The Nanny Reads (16)
  • Yourdori.com (1)
  • crafts (6)
  • kids (14)
  • mixed media art (30)
  • mixed media for kids (5)
  • scrapbooking (24)
  • stories (5)
  • writing (2)
Email Me: Dapoppins@gmail.com

I beg your pardon

All content, including designs, concepts, text, and personal photographs are COPYRIGHT ©2019 Dapoppins. The name Dapoppins is also of my creation, and under this copyright. Please link if you use any content on this blog.

Story Time

Happy Autumn: Sharing my Fall Foxy With You

I saw this little guy at my local Craft Warehouse  last year.  It's a big craft store a little bit like Hobby Lobby, only not.  ...

Copyright © 2016 Dapoppins. Designed by OddThemes